
Listen to This Article
Podcast Episode • 12 min
Quick Answer
The most profitable crypto chart patterns include Head and Shoulders (93% success), Inverse Head and Shoulders (86%), and Falling Wedge (82%). These formations consistently generate $10K+ profits when traded with proper entry/exit strategies. WaveTrader's visual interface makes these patterns 87% easier to spot by converting complex charts into intuitive ocean waves.

Some crypto traders catch every profitable wave while others get wiped out on the same market swells. What separates the winners from the casualties? Chart patterns—those telltale shapes that reveal where the crypto ocean is heading next.
The waves aren't as wild as newcomers imagine. Studies show the most reliable chart patterns deliver success rates above 80%. The Inverse Head and Shoulders pattern stands out as one of the strongest bullish reversal signals, giving sharp traders clear setups for substantial profits. Meanwhile, the Bullish Flag pattern offers straightforward entry points to ride existing uptrends that show no signs of breaking.
Here's what might surprise you: seven commonly spotted chart patterns succeed more than half the time across countless market tests. The most dependable formations include Inverse Head and Shoulders (84%), Head and Shoulders (82%), and Double Bottom (82%), while Channel patterns maintain solid reliability above 70%. For traders just starting their crypto journey, mastering these patterns provides a crucial edge.
Reading these crypto chart formations no longer demands years of screen time. Tools like WaveTrader convert complex market data into intuitive ocean waves, making patterns 87% easier to spot and understand. With over 500 symbols tracked and 15 wave patterns identified, you can stay in profitable Paddle Zones 68% of the time while keeping your Wipeout Risk down to just 12%. The app's break signal system alerts you precisely when patterns complete and trends are ready to ride.
Ready to explore the 11 chart patterns that consistently create $10K+ opportunities? Time to paddle out and catch these money-making waves together.
🔑 Key Takeaways
- Head and Shoulders leads reliability: 93% success rate makes it the most dependable reversal pattern
- Volume confirms breakouts: All patterns need volume surge for valid signals
- False breakouts happen: 10-30% of patterns fail, always use stop-losses
- Higher timeframes win: Daily and weekly charts produce more reliable patterns than hourly
Inverse Head and Shoulders
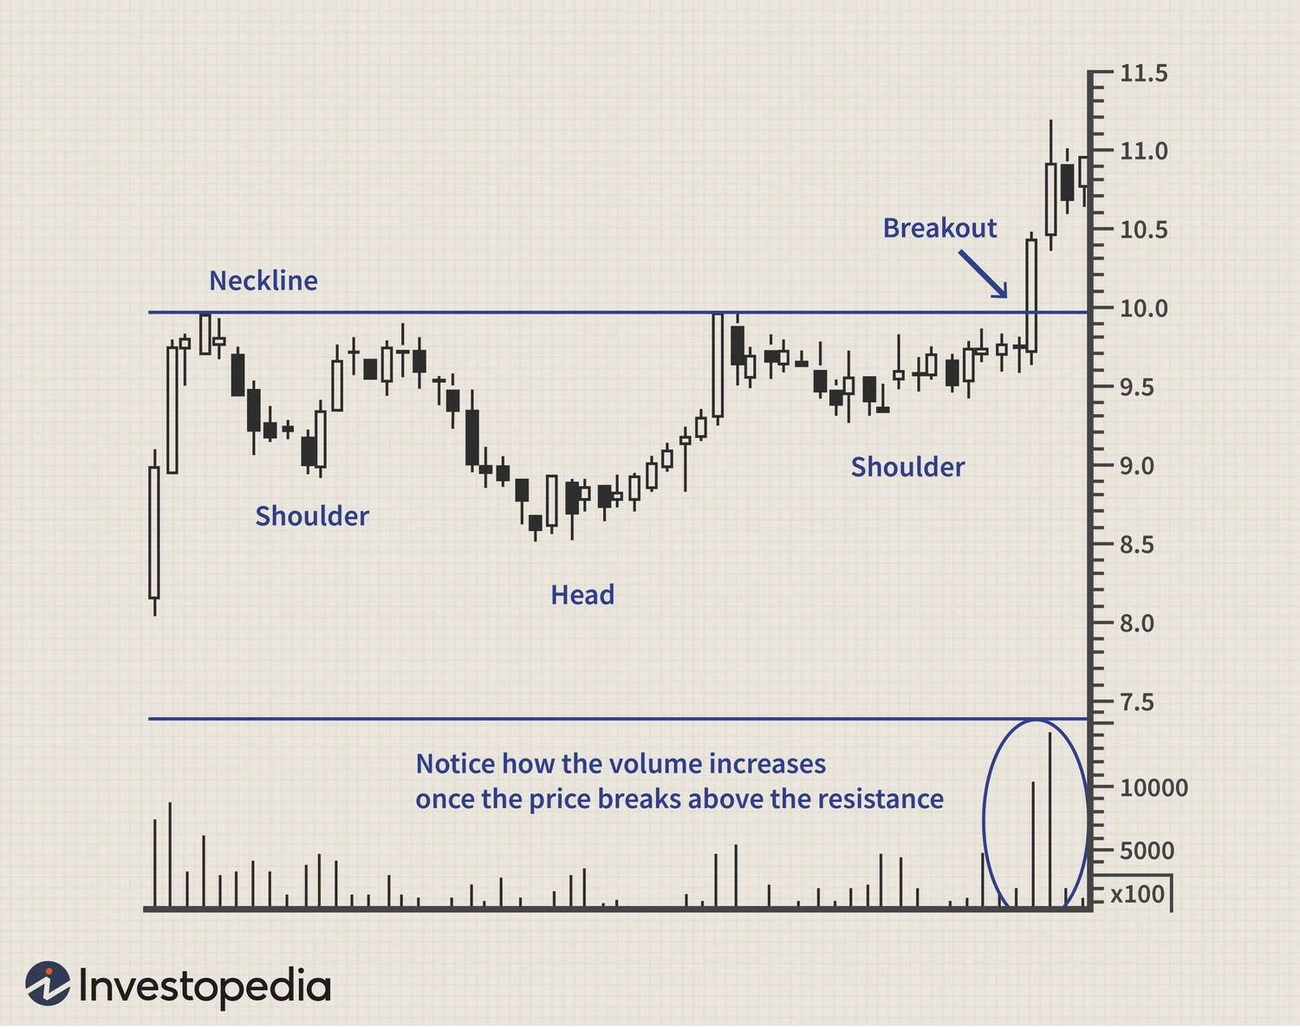 Image Source: Investopedia
Picture three ocean troughs carving into the seafloor—two shallow shoulders flanking one deep canyon in the middle. The Inverse Head and Shoulders pattern delivers exactly this formation on crypto charts, marking where bearish currents finally lose their grip and bullish tides surge back to life.
Pattern Description of Inverse Head and Shoulders
Three successive troughs create this textbook reversal: a left shoulder dip, followed by the deepest head formation, then a right shoulder that mirrors the left's depth. The neckline draws across the peaks between these troughs—your key resistance barrier that price must clear to confirm the pattern. Once that neckline breaks, you're essentially riding the momentum from rough seas into calm, profitable waters.
Neckline
The resistance line connecting the peaks between pattern formations. Breaking this level confirms the pattern and signals entry—like the moment a wave finally crests and begins its powerful surge forward.
Why the Inverse Head and Shoulders works
Market psychology shifts dramatically through each stage of this formation. The left shoulder shows sellers still calling the shots while pessimism runs thick. During the head formation, panic selling hits its peak as fear reaches maximum intensity—yet smart money starts accumulating at these bargain levels. The right shoulder reveals weakening selling pressure as buyers step in with growing confidence, flipping sentiment from bearish despair to bullish hope. WaveTrader's visual interface captures this emotional tide change perfectly, showing the gradual shift from market fear to rising optimism through its intuitive wave analytics system.
How to trade the Inverse Head and Shoulders
Your trading playbook for this pattern:
- Spot the three-trough sequence after a clear downtrend
- Wait for price to break above the neckline with solid volume backing
- Enter long positions once the breakout confirms
- Place your stop-loss below the right shoulder for protection
- Set profit targets by measuring from head to neckline, then projecting that distance upward from your breakout point
Real-world example of Inverse Head and Shoulders
Bitcoin carved out a perfect inverse head and shoulders during 2020's volatile period. After hitting $10,166 in February, BTC entered its downtrend phase. The head bottomed at $3,782 on March 9, followed by recovery to $10,111 by July—forming the right shoulder. Come October-November, an explosive uptrend launched Bitcoin from $11,490 to roughly $19,130, rewarding pattern traders handsomely.
Inverse Head and Shoulders success rate
This formation ranks among crypto's most dependable patterns with an impressive 86% success rate. Traders who master this rare setup often capture some of their biggest wins from these well-timed entries.
When to avoid the Inverse Head and Shoulders
False breakouts can sting when price pushes above the neckline only to reverse quickly, leaving traders caught in bad positions. Skip this pattern when volume stays flat during the breakout or when the move lacks real conviction. Stack additional confirmation from RSI, MACD, or other momentum indicators before committing your capital.
Head and Shoulders
 Image Source: Investopedia
When you see three peaks rising from the crypto ocean—with the middle one towering above its neighbors—you're witnessing one of trading's most reliable tsunami warnings. The Head and Shoulders pattern doesn't just signal trend changes; it screams that bullish momentum is about to crash spectacularly.
Pattern Description of Head and Shoulders
Three distinct peaks tell the whole story. The outer shoulders stand at roughly equal heights while the head reaches significantly higher between them. Connect the low points between these peaks and you've drawn the neckline—your critical support level that, once broken, confirms the pattern.
Picture three waves hitting the beach: two smaller ones flanking a massive central surge. On WaveTrader's interface, this formation appears unmistakably—three consecutive swells where the middle one dwarfs its companions, signaling that buying power is spent.
Why the Head and Shoulders works
The pattern reveals exhausted buyers in vivid detail. During the left shoulder, optimism still flows. The head forms when euphoria peaks—everyone who wanted to buy already has. The right shoulder shows the painful truth: buyers can't muster the same enthusiasm twice.
As prices tumble from the head, sellers flood in. The right shoulder's failure to match previous highs exposes the reality—demand has dried up. Once price crashes through the neckline, the tide officially turns bearish.
How to trade the Head and Shoulders
Master these steps:
- Wait for complete pattern formation—all three peaks clearly visible
- Enter short positions only after neckline breakdown
- Place stop-loss just above the right shoulder
- Calculate targets by measuring head-to-neckline distance, then project downward from breakout
Conservative traders often wait for a retest of the broken neckline before entering. Smart approach—it filters out some false moves.
Real-world example of Head and Shoulders
Bitcoin delivered a textbook Head and Shoulders throughout 2025 after hitting new highs. When BTC finally broke below the neckline, the selloff was swift and brutal—35% down over six weeks. Traders who recognized the pattern early captured substantial profits on the way down.
Head and Shoulders success rate
This pattern boasts a remarkable 93% success rate according to comprehensive studies. Out of 431 samples, only 30 produced false signals—making it one of crypto's most dependable reversal formations.
When to avoid the Head and Shoulders
Despite its stellar track record, roughly 20-30% of Head and Shoulders patterns produce false breakouts. Another 35-40% fail to reach their projected targets. Skip patterns forming on very short timeframes—higher timeframes offer much better reliability.
Never jump in before the neckline breaks. Selling into support rarely works out well, no matter how perfect the pattern looks.
Double Bottom
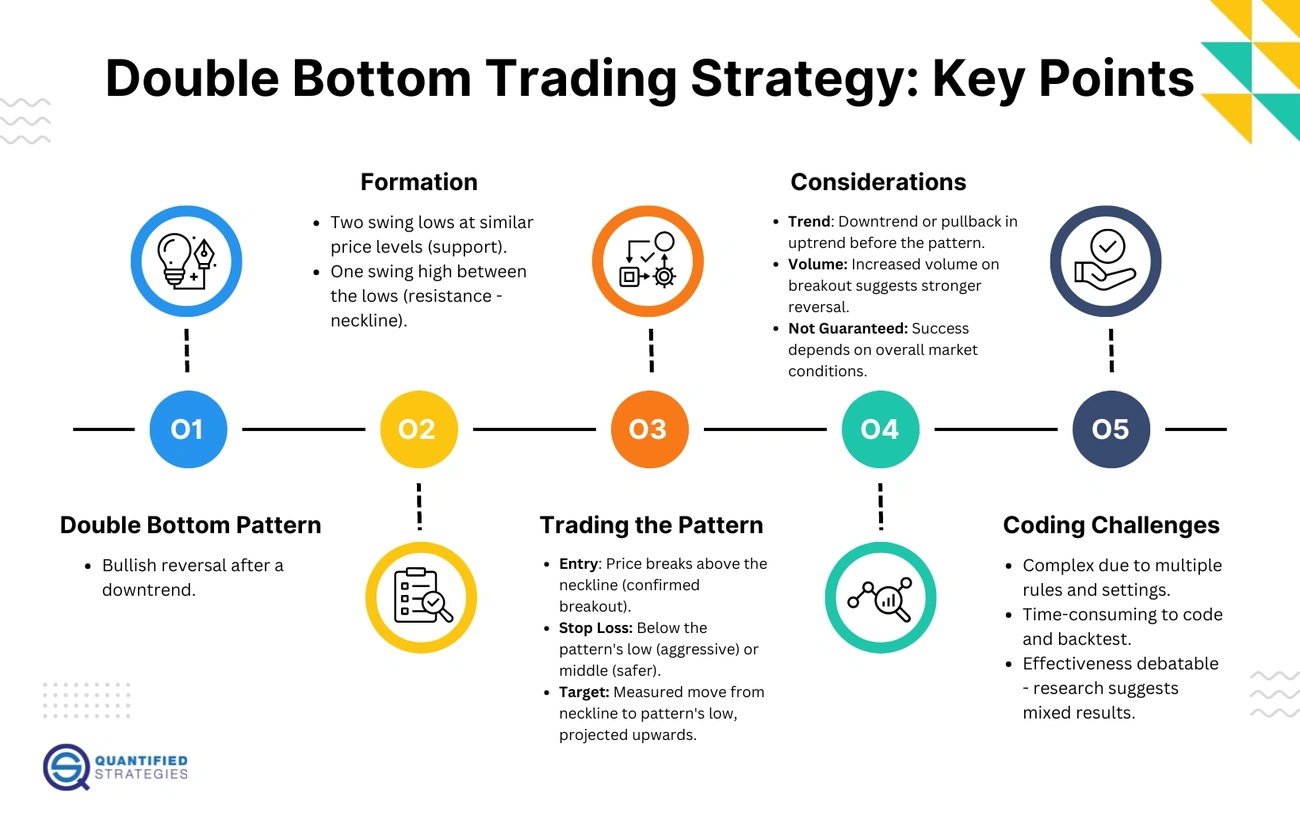 Image Source: Quantified Strategies
Two identical low points on a crypto chart tell a powerful story—sellers have hit their limit twice and failed. The Double Bottom pattern creates a distinctive W-shape that marks the moment bearish tides begin reversing into bullish currents, offering smart traders prime entry points before the surge begins.
Pattern Description of Double Bottom
This W-shaped formation consists of two troughs hitting nearly identical price levels. Price drops to its first bottom, bounces up creating a peak (the neckline), then falls back to test that same support before launching higher. Think of it like watching ocean waves crash against a jetty—twice the water hits the same rocks, but the second time, the tide has shifted and carries the waves much further inland.
Why the Double Bottom works
The pattern reveals solid ground beneath the market chaos. Buyers step in twice at virtually the same price, proving this level holds strong support. The first bottom brings cautious bargain hunters. When price retests and holds again, confidence builds—more buyers enter while sellers lose steam. Like surfers recognizing a reliable break, traders learn to trust this twice-tested foundation. When combined with proper risk management, this pattern becomes a cornerstone of profitable trading strategies.
How to trade the Double Bottom
Master this formation with these steps:
- 🌊 Spot the pattern during clear downtrends with matching lows
- 🌊 Wait for price breaking above the neckline with strong volume
- 🌊 Enter long positions after confirmed breakout
- 🌊 Place stop-loss below the second bottom
- 🌊 Set targets by measuring bottom-to-neckline distance, then project upward
Real-world example of Double Bottom
Bitcoin painted a textbook example between May-July 2025. The first low hit $34,000, rallied to $39,000 (forming the neckline), then retested at $35,100 for the second bottom. After breaking above the neckline with volume, BTC surged to $62,900 by October—delivering substantial gains to pattern-savvy traders.
Double Bottom success rate
This formation ranks among the most dependable reversal signals. Research confirms success rates between 70-75%, with some studies showing 82% accuracy. Thomas Bulkowski's analysis found 68% of Double Bottoms reach their price targets—nearly double the success rate of bearish counterparts.
When to avoid the Double Bottom
Choppy sideways markets generate false signals that can fool even experienced traders. Skip patterns lacking volume confirmation—breakouts need buying pressure to succeed. Also avoid formations where bottoms differ significantly in depth or appear after brief downtrends rather than prolonged bearish moves.
Double Top
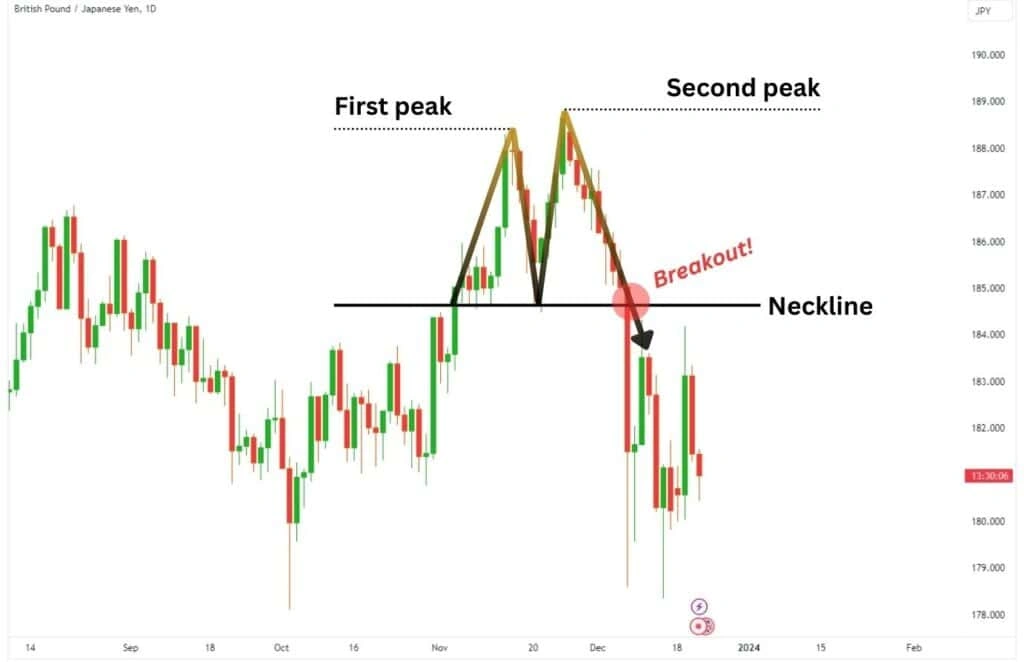 Image Source: Alchemy Markets
The M-shaped Double Top pattern spells trouble for crypto bulls—two peaks hitting the same ceiling before the whole structure comes crashing down. Seasoned traders spot this formation like surfers reading dangerous reef breaks, knowing when it's time to paddle back to shore before the wipeout hits.
Pattern Description of Double Top
Picture two identical waves slamming against an unmovable sea wall—that's your Double Top in action. This pattern creates two consecutive peaks at nearly identical price levels, separated by a valley in between. The distinctive M-shape emerges when an asset fails to break through resistance not once, but twice. The neckline forms at the lowest point between these peaks, marking critical support that price must hold. On WaveTrader's interface, these formations show as twin swells crashing repeatedly against the same barrier—market momentum clearly stalling out.
Why the Double Top works
Market psychology tells the whole story here. After the first peak, profit-takers jump ship, creating that initial drop. Bulls rally for round two, pushing toward previous highs, but they can't quite get there—the buying power just isn't strong enough. When price finally cracks below the neckline, it's game over for the bulls as bears take full control. Think of it like this: buyers got two chances to prove their strength and failed both times. The writing's on the wall.
How to trade the Double Top
Here's your playbook for riding this bearish wave:
- 📉 Watch for the neckline break with solid volume backing the move
- 📉 Enter short positions only after confirmation—no guessing games
- 📉 Plant your stop-loss just above that second peak
- 📉 Target profits by measuring peak-to-neckline distance and projecting downward
Real-world example of Double Top
Crude oil futures painted a perfect Double Top picture in October 2023, peaking twice near USD 90.00 per barrel. When price sliced through the USD 86.00 neckline, it triggered a brutal 39% decline over the following weeks. Both MACD and RSI flashed red warning signals during that second peak, confirming the setup.
Double Top success rate
This pattern delivers moderate but respectable results. About 60-70% of confirmed Double Tops follow through with the expected downward move. Here's the catch though—only 39% actually hit their full price targets, which falls short of the 68% target-hitting rate you see with Double Bottom patterns.
When to avoid the Double Top
Skip this setup when volume stays flat or the breakout looks weak. Choppy, sideways markets also breed false breakouts that can burn you. Most importantly—never jump in before that neckline actually breaks. Premature entries usually end in tears.
Falling Wedge
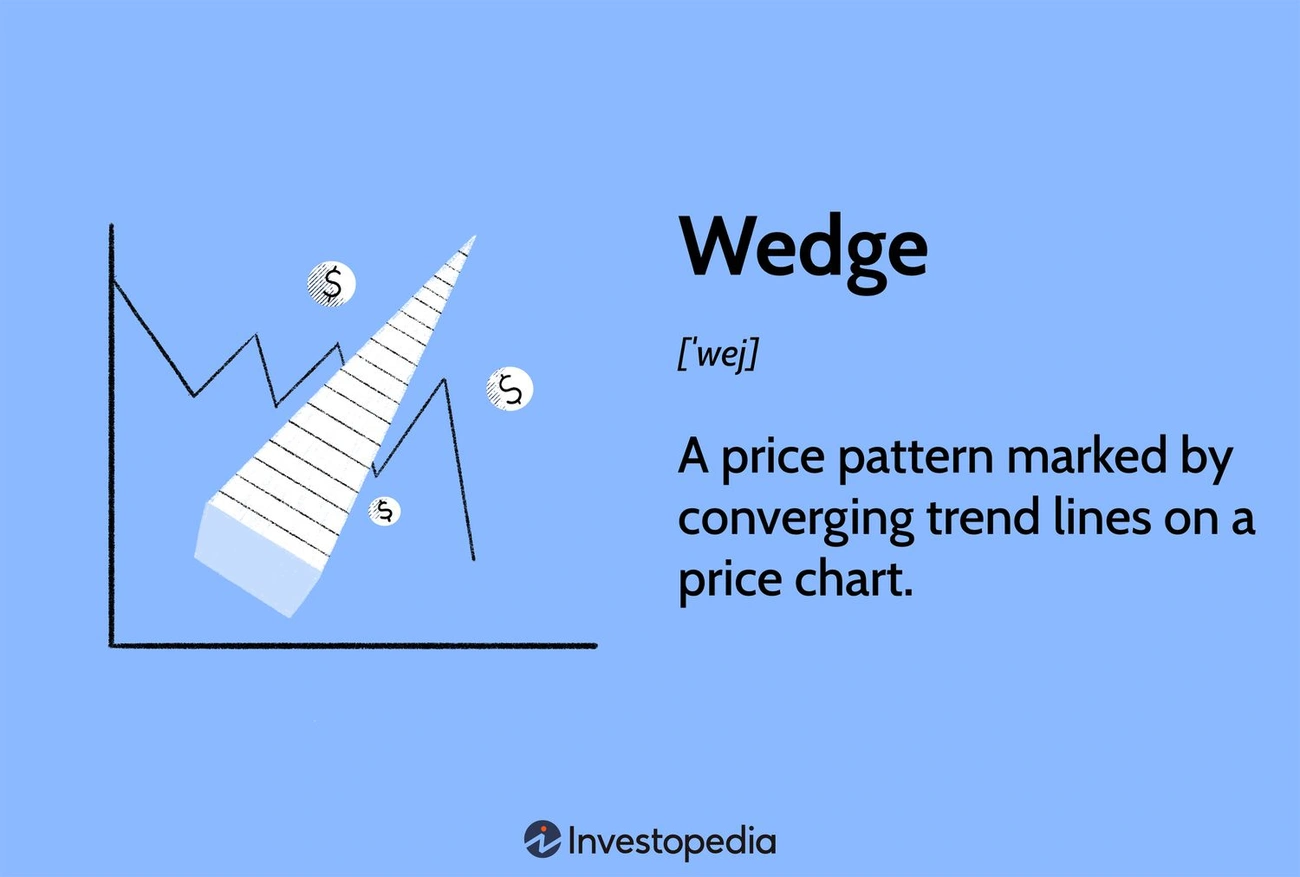 Image Source: Investopedia
The Falling Wedge pattern emerges like a coiled spring in crypto markets—price gets squeezed tighter and tighter until it explodes upward. This distinctive downward-sloping formation ranks among the most profitable bullish setups, catching traders who can spot the telltale narrowing lines just before the breakout surge.
Pattern Description of Falling Wedge
A falling wedge shows two converging trendlines sloping downward, with the upper line connecting lower highs and the lower line connecting lower lows. Price makes lower highs and lower lows, yet the decline gradually loses steam. On WaveTrader's visual interface, these formations appear as tapering pressure zones that compress before unleashing explosive upward momentum.
Why the Falling Wedge works
The magic happens because selling pressure runs out of gas. Buyers start stepping in at lower price levels while the downward momentum weakens. Those converging lines tell the story—sellers lose control while buyers build confidence. Market sentiment shifts from bearish despair to bullish hope.
How to trade the Falling Wedge
Here's your playbook:
- ✅ Enter when price breaks above the upper trendline
- ✅ Set stop-loss just below the lower trendline
- ✅ Calculate targets using the wedge's height projected upward from breakout
- ✅ Watch for volume surge during breakout for confirmation
- ✅ Combine with RSI or MACD for stronger signals
Real-world example of Falling Wedge
Bitcoin delivered a textbook example throughout 2025, forming a perfect falling wedge before breaking out for quick 10% gains. Volume dried up during formation, then spiked at the breakout point—giving alert traders clear entry signals.
Falling Wedge success rate
The numbers speak loudly: 82% of falling wedges break upward as expected. Price targets get reached in 63-88% of cases. Backtests show a solid 64% success rate across crypto markets, with maximum gains hitting 32% in optimal conditions.
When to avoid the Falling Wedge
Watch out for weak volume during breakouts—this often signals a false breakout or bull trap. False breakouts occur in 10-27% of cases. Never trade this pattern alone—always use supporting indicators and check broader market conditions before risking capital. Choosing the right exchange with low fees can also help maximize your profits from these patterns.
Rising Wedge
 Image Source: ATAS
The market climbs steadily upward, lulling traders into false security—then crashes without warning. The Rising Wedge pattern earns its reputation as one of crypto's most deceptive bearish signals, catching overconfident bulls in a dangerous undertow that smart traders ride for five-figure profits.
Pattern Description of Rising Wedge
The Rising Wedge traps price between two converging trendlines sloping upward, with the support line rising more steeply than the resistance line. This triangular compression creates higher highs and higher lows, yet momentum gradually weakens as the trading range narrows. Look for at least three touches on both lines for proper identification.
Why the Rising Wedge works
Prices climb within the wedge, but this upward movement masks weakening buying momentum. As the wedge tightens, trading volume typically drops—buyers lose control while sellers quietly build strength. On WaveTrader's interface, this shows as waves gradually losing power before a major wipeout strikes.
How to trade the Rising Wedge
Smart money waits for the trap to spring:
- ⚠️ Enter short positions only after price breaks below the lower trendline with increased volume
- ⚠️ Confirm the breakdown before committing capital
- ⚠️ Place stop-loss just above the last swing high within the pattern
- ⚠️ Calculate targets by measuring the wedge's height at its widest point and projecting downward
Real-world example of Rising Wedge
The Vanguard Financials ETF (VFH) formed a textbook Rising Wedge between October 2022 and March 2023, with higher lows at USD 72.96 and USD 80.37 and higher highs at USD 88.83 and USD 90.87. After breakdown, price hit the target of USD 74.09 by March 27, 2023.
Rising Wedge success rate
This deceptive pattern delivers impressive results with an 81% success rate in bull markets. Roughly 70% of rising wedges break downward as expected.
When to avoid the Rising Wedge
Skip this setup without volume confirmation or when breakouts lack conviction. False breakouts catch 10-30% of traders off guard.
Bullish Flag
 Image Source: Alchemy Markets
Ever watched a surfer catch a perfect wave, pause to adjust their stance, then ride the next powerful surge even higher? That's exactly what the Bullish Flag pattern offers crypto traders—a brief rest stop before prices continue their upward journey.
Pattern Description of Bullish Flag
The Bullish Flag shapes up like its name suggests: a flag on a pole. First comes the flagpole—a sharp price spike with strong volume. Then the flag itself—a small downward-sloping channel where price consolidates near recent highs. On WaveTrader's visual display, this appears as one powerful wave followed by gentler ripples, building energy for the next big surge.
Continuation Pattern
A chart formation that signals the existing trend will resume after a brief pause. Like a surfer maintaining momentum between wave sets, these patterns show temporary consolidation before the dominant trend continues.
Why the Bullish Flag works
Simple market psychology drives this pattern. After a strong upward move, some traders cash out their profits while fresh buyers hesitate, creating temporary balance. This pause lets both sides catch their breath. Notice how volume typically drops during the flag formation—a natural breather before momentum kicks back in. Think of it as the calm before the storm, but in a good way.
How to trade the Bullish Flag
Want to ride this wave correctly?
- 🏄 Enter once price breaks above the flag's upper resistance line
- 🏄 Set your stop-loss just below the flag's lowest point
- 🏄 Calculate targets by measuring the flagpole's height, then project upward from breakout
- 🏄 Watch for volume confirmation—quiet during consolidation, loud at breakout
Real-world example of Bullish Flag
Bitcoin's late 2020 rally showcased textbook bull flags on daily charts. Each flag signaled more upside as the bull market gained steam. Smart traders used these patterns as structured entry points, capturing significant moves without chasing prices higher.
Bullish Flag success rate
Historical backtests reveal the Bullish Flag pattern hits its target 65% of the time. Among continuation setups in crypto trading, properly identified flags rank as highly reliable.
When to avoid the Bullish Flag
Watch out for flags that retrace too deep—ideally, they shouldn't give back more than 50% of the flagpole's height. False breakouts happen when price pops above resistance only to quickly reverse. No volume surge at breakout? That's your cue to stay on the sidelines.
Bearish Flag
 Image Source: Delta Exchange
Skilled wave riders know when dangerous undertows lurk beneath calm surfaces. The Bearish Flag pattern works the same way—what looks like a harmless pause often signals another powerful crash ahead.
Pattern Description of Bearish Flag
The Bearish Flag consists of three key components: a sharp downward movement (flagpole), a brief consolidation phase forming a parallel channel or slight upward slant (flag), and a breakout below the lower trendline. On WaveTrader's visual display, this appears as a major downward wave followed by small ripples before another powerful downward surge.
Why the Bearish Flag works
Market psychology reveals itself clearly here—sellers stay in control despite catching their breath. Throughout the consolidation phase, decreased volume indicates a natural pause before the downtrend resumes. The brief upward retracement rarely recovers more than 38.2% of the flagpole's decline.
How to trade the Bearish Flag
Smart traders follow these steps:
- 🔻 Enter short positions once price breaks below the flag's lower boundary
- 🔻 Set stop-loss orders just above the flag's upper boundary
- 🔻 Calculate profit targets by measuring the flagpole's height and projecting downward from breakout
- 🔻 Look for volume confirmation—ideally decreasing during consolidation and increasing upon breakout
Real-world example of Bearish Flag
Before the 2023 crude oil decline, a textbook bearish flag formed as prices consolidated in an upward channel following a steep drop, subsequently breaking lower and falling an additional 39%.
Bearish Flag success rate
Technical analysts report high reliability with approximately 70% of properly identified patterns reaching their target objectives.
When to avoid the Bearish Flag
Exercise caution with this pattern during choppy markets or when volume remains inconsistent. Watch out for false breakouts, which occur in 10-30% of cases.
Ascending Triangle
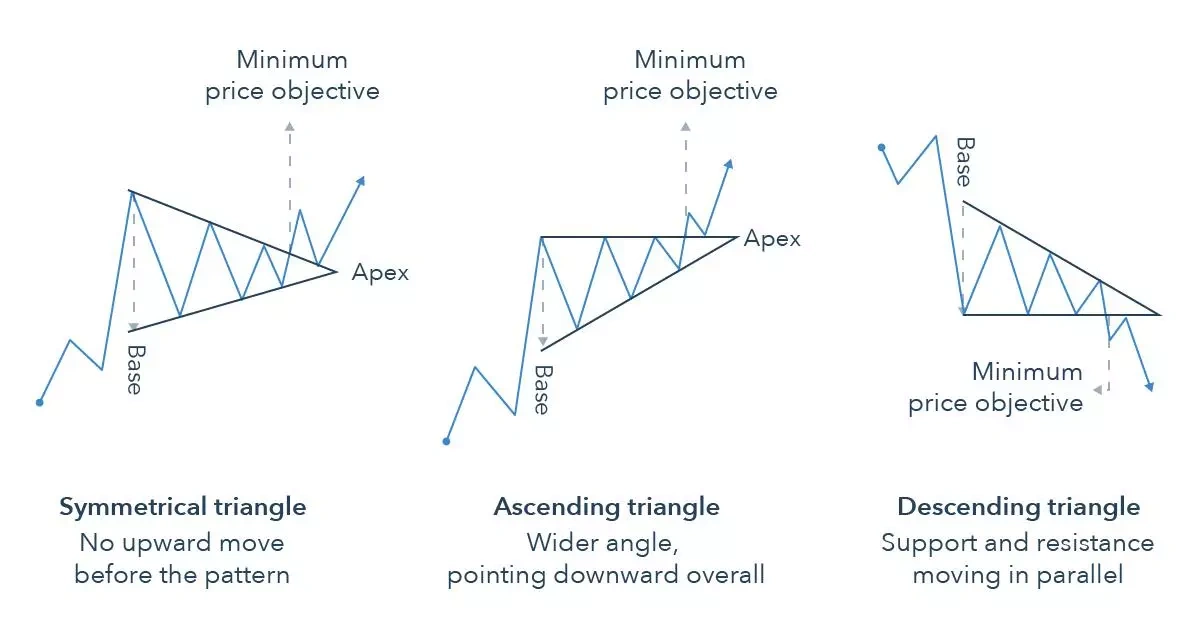 Image Source: IG
Watch an Ascending Triangle form and you're witnessing one of crypto's most predictable setups—like spotting the perfect surfboard-shaped wave building before it breaks. This bullish continuation pattern creates a triangular compression with a flat ceiling and rising floor, signaling mounting pressure before an explosive upward move.
Pattern Description of Ascending Triangle
The Ascending Triangle features a horizontal resistance line connecting multiple swing highs at the top, coupled with an upward-sloping trendline connecting progressively higher lows at the bottom. These converging lines create a triangular compression zone where price gradually squeezes tighter until breakout.
Why the Ascending Triangle works
Each dip gets bought faster than the last one. This pattern demonstrates increasing buyer strength as traders repeatedly purchase at higher levels each time the price dips. The psychology is clear—buyers step in earlier with each retracement, showing their eagerness to own the asset. On WaveTrader's interface, this appears as waves consistently reaching higher troughs before eventually breaking through resistance.
How to trade the Ascending Triangle
To catch this wave:
- 📈 Wait for price to close above the horizontal resistance line
- 📈 Enter only with volume confirmation on the breakout
- 📈 Set stop-loss just below the ascending trendline
- 📈 Calculate targets by measuring the triangle's height at its widest point and projecting upward from breakout
Real-world example of Ascending Triangle
Chiliz (CHZ) demonstrated a textbook Ascending Triangle in 2023, breaking out and delivering +10% gains within three days.
Ascending Triangle success rate
Backtesting shows this pattern boasts an impressive 68% success rate. Two-thirds of properly identified Ascending Triangles generate profit.
When to avoid the Ascending Triangle
False breakouts comprise 10-30% of cases. Skip trading when volume stays weak during breakout or when the pattern squeezes too close to the apex.
Descending Triangle
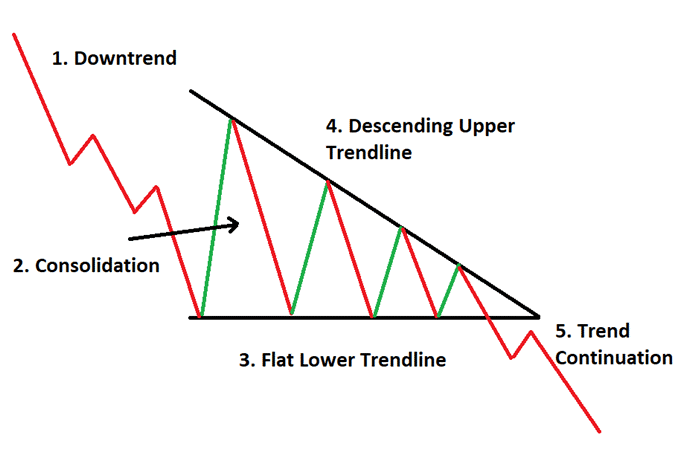 Image Source: Corporate Finance Institute
Sharp traders spot the Descending Triangle forming like storm clouds gathering over calm waters—a powerful bearish signal that warns of dangerous currents ahead. On WaveTrader's visual interface, this pattern shows waves gradually losing height as they crash against an unyielding support reef, until that final breakthrough sends prices tumbling.
Pattern Description of Descending Triangle
The Descending Triangle creates two distinct boundaries: a flat horizontal support line connecting similar lows and a downward-sloping resistance line connecting progressively lower highs. This triangular squeeze zone reveals sellers growing more aggressive while buyers dig in defensively at support.
Why the Descending Triangle works
Market psychology becomes crystal clear through this formation. Sellers gain strength with each test—every bounce off support leads to weaker rallies that reach lower peaks, showing increasing selling pressure. The pattern tells a story of desperation as sellers push harder with each attempt, gradually overwhelming buyer resistance.
How to trade the Descending Triangle
When this pattern sets up:
- 📉 Wait for price to crash below the horizontal support line
- 📉 Set your stop-loss above the triangle's last swing high
- 📉 Project targets by measuring the triangle's height downward from the breakdown point
- 📉 Watch for volume spikes during the breakdown—this confirms the move
Real-world example of Descending Triangle
Intel's stock delivered a textbook descending triangle in early 2023, breaking support with heavy volume and triggering a sharp decline.
Descending Triangle success rate
This bearish formation delivers on its promise approximately 67% of the time. Experienced traders regularly profit from these clear warning signals.
When to avoid the Descending Triangle
Watch out for false breakdowns—they happen in 10-30% of cases. Skip the trade if volume stays weak during the breakdown or if the break lacks conviction.
Cup and Handle
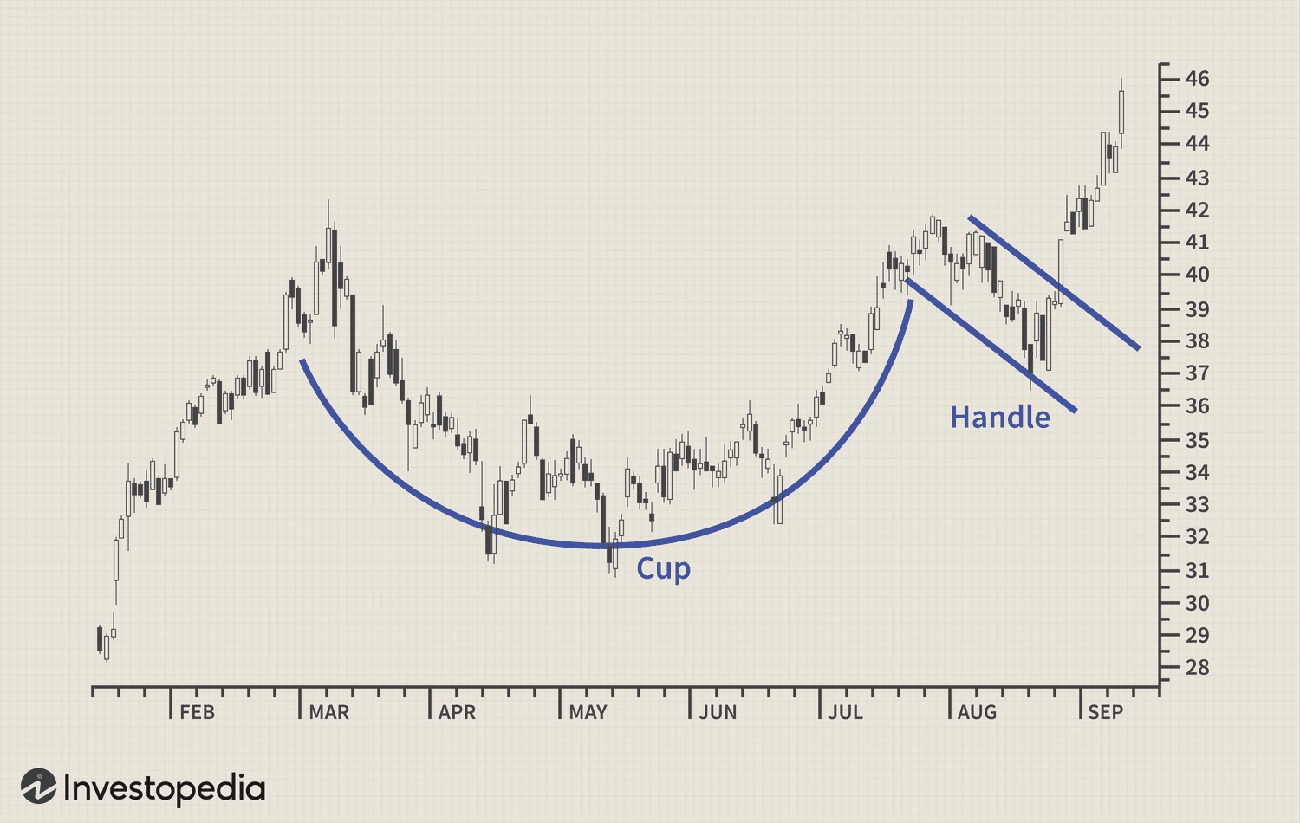 Image Source: Investopedia
Sometimes the best waves take time to build. The Cup and Handle pattern rewards patient traders who can spot this reliable bullish continuation setup—imagine watching the tide slowly gather strength before delivering a perfect ride. Technician William J. O'Neil first identified this formation, and it remains one of the most dependable patterns for crypto traders willing to wait for the right moment.
Pattern Description of Cup and Handle
The Cup and Handle creates a distinctive U-shaped cup followed by a brief downward-sloping handle on your charts. The cup should show a smooth, rounded bottom rather than a sharp V-shape, indicating healthy accumulation rather than panic selling. This pattern typically unfolds over 7 to 65 weeks, making it a medium to long-term setup worth watching. On WaveTrader's interface, these formations appear like perfect bowls carved by ocean currents, followed by a gentle spill before the next surge.
Why the Cup and Handle works
During cup formation, buying interest steadily builds while selling pressure fades. The psychology reveals a crucial shift—bears lose momentum as bulls quietly accumulate positions. Like watching the tide gather strength in a sheltered cove, the cup's rounded bottom shows sellers running out of steam before buyers take control. The handle represents one final shakeout of weak holders before the real move begins.
How to trade the Cup and Handle
To catch this profitable wave:
- ☕ Enter when price breaks above the handle's resistance with conviction
- ☕ Place your stop-loss below the handle's lowest point
- ☕ Set targets by measuring the cup's depth and projecting upward from the breakout
- ☕ Watch for volume confirmation—quiet during formation but spiking at breakout
Real-world example of Cup and Handle
Wynn Resorts painted a textbook Cup and Handle back in 2013. The cup formed near the IPO price, followed by a clean handle before breaking out to deliver impressive 90-point gains within five months. The pattern gave patient traders months to prepare for the eventual breakout.
Cup and Handle success rate
This pattern delivers exceptional reliability across timeframes. Success rates climb from 70% for short-term trades (1 year) to 80% for medium-term positions (5 years), reaching 85% for long-term holds (10 years). The longer your horizon, the better this pattern performs.
When to avoid the Cup and Handle
Skip patterns with sharp V-shaped bottoms or handles that drop below the cup's midpoint—these signal instability rather than healthy consolidation. Also avoid handles that form without volume confirmation, as these often lead to false breakouts. Patience pays with this pattern, but only when the setup is clean. Understanding tax implications of your trades is also crucial when holding positions for these longer timeframes.
Pattern Performance Breakdown
Here's your complete wave-reading cheat sheet. These success rates come from thousands of real trades across crypto markets—think of this as your surf report showing which patterns deliver the biggest rides.
| Pattern Name | Success Rate | Pattern Type | Key Trading Signal | WaveTrader Visualization | Primary Risk Factor |
|---|---|---|---|---|---|
| Inverse Head and Shoulders | 86% | Reversal (Bullish) | Break above neckline with volume | Three consecutive troughs forming perfect surfing waves | False breakouts (10-20%) |
| Head and Shoulders | 93% | Reversal (Bearish) | Break below neckline | Three waves where middle towers over neighbors | 20-30% false breakouts |
| Double Bottom | 70-75% | Reversal (Bullish) | Break above neckline with volume | Two consecutive troughs creating ideal entry points | False signals in choppy markets |
| Double Top | 60-70% | Reversal (Bearish) | Break below neckline | Twin waves crashing against resistance | 39% target achievement rate |
| Falling Wedge | 82% | Reversal (Bullish) | Break above upper trendline | Tapering ocean swells before powerful surge | 10-27% false breakouts |
| Rising Wedge | 81% | Reversal (Bearish) | Break below lower trendline | Waves gradually losing power before wipeout | 10-30% false breakouts |
| Bullish Flag | 65% | Continuation (Bullish) | Break above flag resistance | Powerful wave followed by smaller ripples | False breakouts without volume |
| Bearish Flag | 70% | Continuation (Bearish) | Break below flag support | Major downward wave with small ripples | 10-30% false breakouts |
| Ascending Triangle | 68% | Continuation (Bullish) | Break above horizontal resistance | Waves reaching higher troughs | 10-30% false breakouts |
| Descending Triangle | 67% | Continuation (Bearish) | Break below horizontal support | Increasingly shallow waves hitting support | 10-30% false breakouts |
| Cup and Handle | 70-85% | Continuation (Bullish) | Break above handle resistance | Smooth U-shaped wave formation | Sharp V-bottoms indicating instability |
The Head and Shoulders tops this list with 93% accuracy—when you spot this pattern, the odds strongly favor a major reversal. The Inverse Head and Shoulders follows closely at 86%, making these twin formations your most reliable signals for catching major trend changes.
Notice how continuation patterns like flags and triangles cluster around 65-70% success rates? That's still profitable territory when you're riding existing trends rather than fighting them.
🤔 Frequently Asked Questions
What is the most reliable crypto chart pattern?
The Head and Shoulders pattern boasts the highest reliability at 93% success rate, followed by the Inverse Head and Shoulders at 86%. These reversal patterns consistently deliver the most dependable trading signals when properly identified with volume confirmation.
How long does it take to learn crypto chart patterns?
With modern tools like WaveTrader, traders can start recognizing basic patterns within days. The app's visual wave interface makes patterns 87% easier to spot. However, mastering entry and exit timing typically takes 2-3 months of practice with real market conditions.
Can chart patterns guarantee profits in crypto trading?
No pattern guarantees profits. Even the most reliable patterns have 10-30% false breakout rates. Success comes from combining pattern recognition with proper risk management, volume confirmation, and additional technical indicators. Always set stop-losses and never risk more than you can afford to lose.
Which timeframe is best for crypto chart patterns?
Higher timeframes (4-hour, daily, weekly) produce more reliable patterns with fewer false signals. Day traders might use 15-minute or 1-hour charts, but these generate more noise. The Cup and Handle pattern, for example, shows 70% success on 1-year timeframes versus 85% on 10-year timeframes.
How much capital do I need to trade chart patterns?
You can start pattern trading with as little as $100-500, but $1,000-5,000 provides better risk management flexibility. The key is position sizing - never risk more than 1-2% of your capital per trade, regardless of how perfect the pattern looks.
Riding the Pattern Wave: Final Thoughts
These 11 crypto chart patterns separate skilled wave riders from weekend casualties. The numbers don't lie: Head and Shoulders formations deliver 93% success rates, while Inverse Head and Shoulders patterns hit their targets 86% of the time. Cup and Handle setups maintain 70-85% reliability across different timeframes.
Each pattern reveals market psychology at work. Double Bottoms show accumulation zones where smart money enters. Rising Wedges expose exhausted buyers before the inevitable crash. Like reading tide charts before paddling out, these formations tell you exactly where the current is heading.
WaveTrader makes pattern recognition effortless—complex price action becomes clear wave formations on your screen. No more squinting at messy charts or second-guessing entry points. The interface shows you when to paddle into Zones and when Wipeout conditions are building. Combined with the app's ABC correction pattern recognition and Fibonacci retracement tools, you'll have a complete arsenal for spotting high-probability setups.
Every pattern comes with specific rules: entry signals, stop-loss levels, and profit targets. False breakouts still happen 10-30% of the time, so wait for volume confirmation before committing your capital. Smart traders use multiple indicators to filter out the noise.
The crypto ocean rewards those who respect its patterns. Whether you're catching the surge after a Falling Wedge breakout or avoiding the crash when a Descending Triangle fails, these formations provide your roadmap to consistent profits.
Seasoned traders don't fight the current—they read the waves and position themselves perfectly.
Ready to turn pattern recognition into $10K+ profits? Watch for these formations, respect the signals, and prepare to ride the most profitable swells in crypto waters. Download WaveTrader today and let our visual wave interface transform how you spot and trade these powerful patterns.
Disclaimer: This article is for educational and informational purposes only. It does not constitute financial, investment, or trading advice. Cryptocurrency markets are volatile and carry significant risk. Past performance does not guarantee future results. Always do your own research and consider consulting a qualified financial advisor before making any investment decisions.